Aside from software functionality and performance, a personalized working space which fulfils your needs and requirements, is half the battle won. Royal TS/X provides a full range of settings to customize the way that you work with it. In this blog post we want to introduce the most common tweaks, which will help you configure the app according to your everyday requirements.
1. Navigation Panel
First things first – you can personalize the Navigation Panel (also known as “Sidebar” on the Mac). Here’s a list of settings that can be tweaked according to your personal preferences:
- The item/object colors can be changed – please find the instructions in our “User Interface Personalization” Blog post.
- To adapt the font size in Royal TSX (for macOS) please open the “User Interface” section in the “Preferences” dialog (⌘,). In Royal TS (for Windows) you can find the font size configuration under “Options” – “User Interface”.
- The “Behavior” section of the “Preferences”/”Options” allows you to configure the default behavior when single- and double-clicking on objects in the Navigation Panel. In detail, you can assign different actions for inactive connections, active connections, credentials and task objects. So feel free to try out this feature and find out which settings you feel the most comfortable with.
- Royal TSX (for macOS) specific: You can let Royal TSX automatically hide the Navigation Panel by enabling “View” – “Autohide Navigation Panel”. This feature is a smart tool to get some more screen real estate. To display the Navigation Panel in this mode, simply hover with the mouse over the left window edge. If you prefer the Navigation Panel on the right side of your screen, don’t worry, you can change the side in the “Preferences” in the “Navigation Panel” section. And if that’s still not enough, you can even adjust the Delay, when the Navigation Panel shows up 😉
- Royal TS (for Windows) specific: The Navigation Panel, as all panels, can be moved, rearranged and docked anywhere in your UI. Similar to Royal TSX (for macOS) you can “Auto-Hide” the Ribbon by clicking the “Ribbon Display Options” in the top right of the panel: Docking Panels

2. Customizable Toolbar (for macOS)/Ribbon (for Windows)
Next, we would like to introduce you to another useful feature to customize your UI. As a Mac user, you can personalize the Toolbar in Royal TSX, whereas Windows users have similar options to change the so-called Quick Access Toolbar (QAT) and the Ribbon in Royal TS. You can find all you need to know about these settings in our “User Interface Personalization” blog post.
3. Full Screen Mode
If you prefer to make the most out of your available screen space, Royal TSX (for macOS) also supports the native macOS full screen mode. As in all macOS apps simply click the green Traffic Light Button and et voilà – full screen on!
Quick Tip: Before entering the Full Screen Mode activate “Use Extended Full Screen” in the “View” menu to (a) hide the Toolbar and (b) switch the Navigation Panel into “Auto-Hide” mode.
Though Windows doesn’t provide a real Full Screen Mode, you can emulate one by selecting the “Auto-Hide” function, which you can find in the top right of the panel (for more information please have a look at point 1. Navigation Panel).
4. Tabs/Windows
We know that connections are the core of your daily business, accordingly, you can adapt connections to…
- open as a tab in the main window.
- open in a separate window. In this mode, you can even specify which monitor the connection should open in.
- open in a full screen. Likewise, select a specific monitor to open in.
You can find all of these settings in the “Window Mode” section of your connection’s properties. Alternatively, you can temporarily change the “Window Mode” by using “Connect with Options” in the context menu of your connections. After opening a tab, you can easily drag-and-drop and re-order it according to your needs.
To open an active tab in a new window, just drag-and-drop it out of the main window. The same method works for moving tabs between different windows or screens.
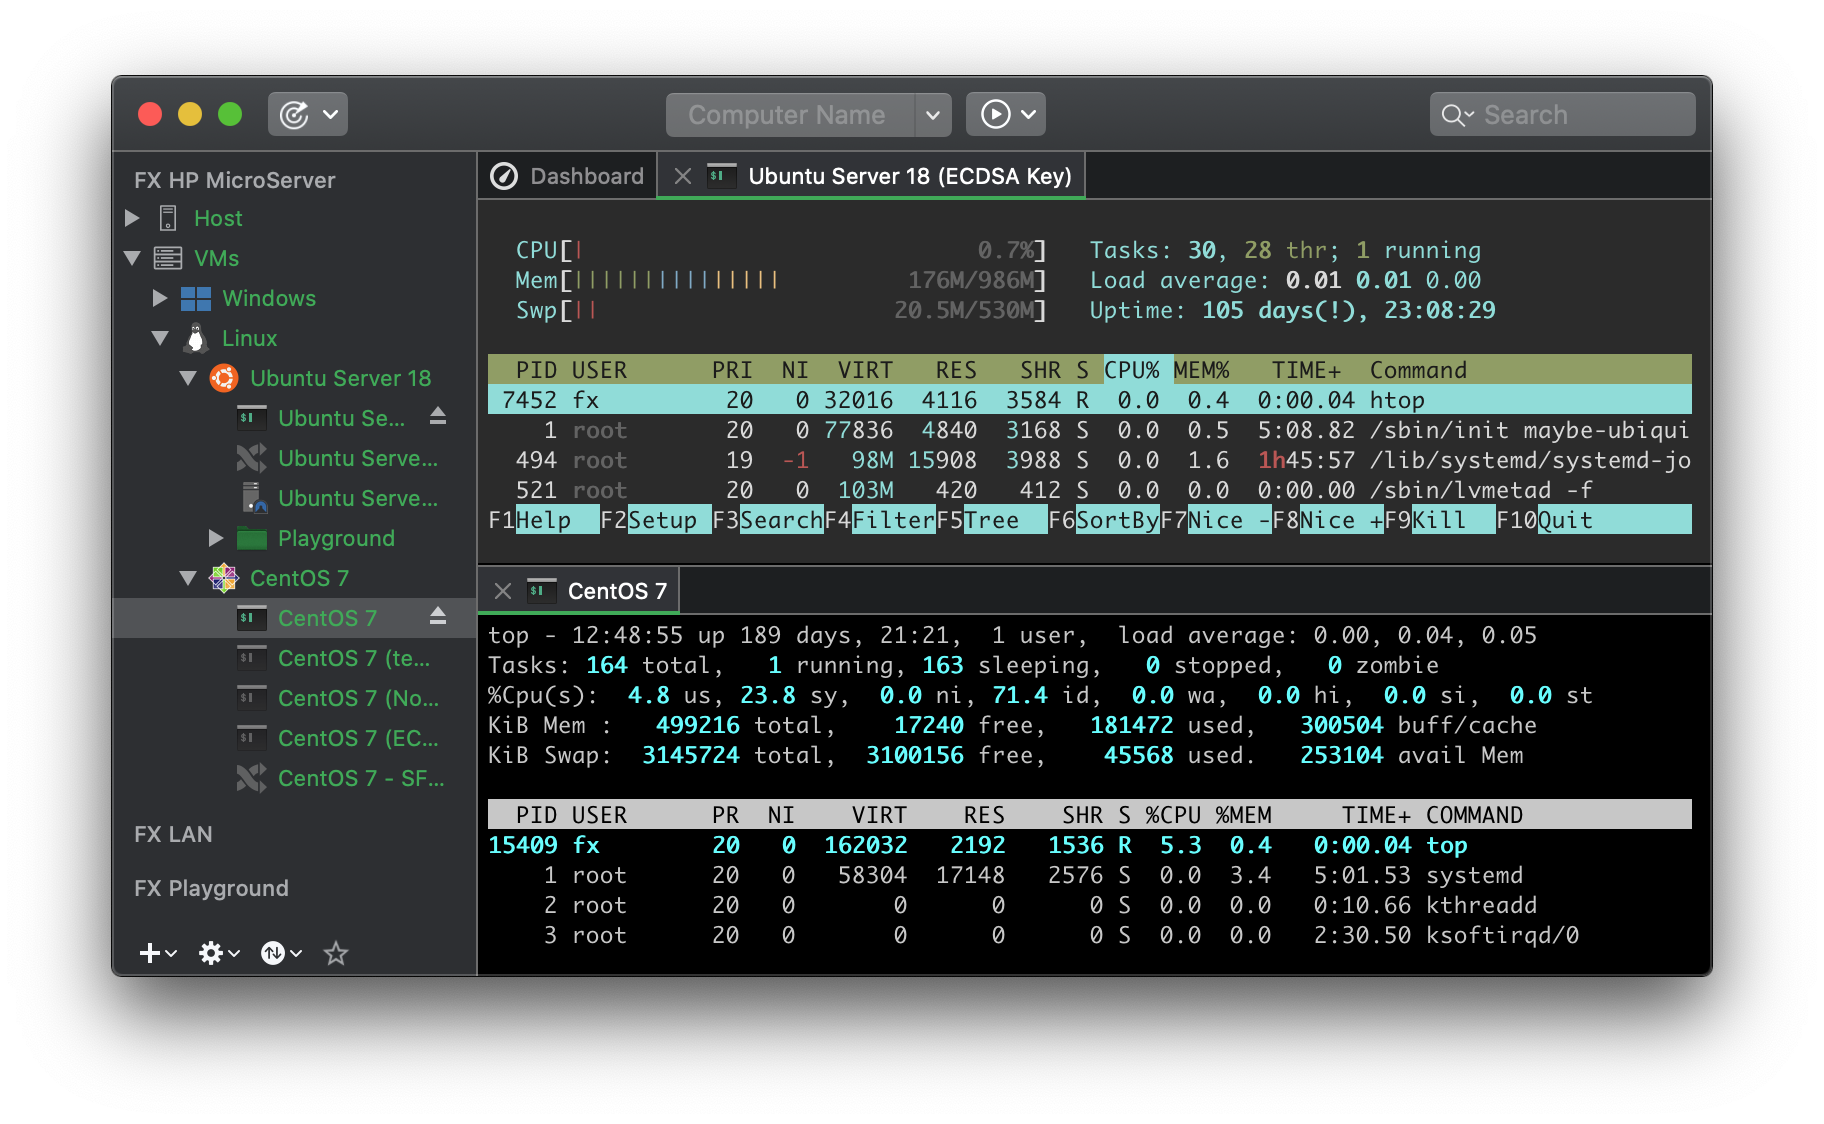
Split Tabs
When there are two or more tabs present/open, you can split them. This option can be very useful, e.g. to monitor different connections at the same time in the same window. On the Mac, you find this option by right-clicking on a tab and select “Split Tabs”. Windows users just drag-and-drop and place the tab onto the preferred window area.
Quick Tip for Mac users: If you prefer a horizontal splitting instead of a vertical, simply open the tab menu while holding ⌥ (“alt/option”) and select “Split Tabs Horizontally”. Yeah! You can spot the difference in the screenshot down below:
Besides splitting and arranging connection tabs, there are some more tab features in Royal TS (for Windows): First, open all the connections, you want to arrange, in the background. Next, click “View” – “Layout” – here you find several options, how to display and order these connections onto your screen. For more details about “Tab Layouts” please refer to this video.
With the summarized features described above, you already have a vast range of tools and options to personalize your working space. For more information on how to optimize your UI graphically, please take a look at our “User Interface Personalization” blog post. Still haven’t found the right settings to fulfil your daily needs or do you have any suggestions for future improvements? Feel free to drop us a post in the Royal Apps Forums.