A very popular feature request for Royal TS/X was the ability to save connections to a central repository and allow multiple users to access a shared set of connections. If you are working in a team, chances are that everyone in the team needs access to the same set of servers.
We’ve discussed several approaches to solve the problem. On the very top of the list was, of course, a central SQL server as a repository store. The more we thought about the implications, pros and cons, we realized that a SQL server might not be the best way to implement a feature like this. So we chose a different approach.
Royal TS/X solves multi-user access in a simple and elegant way and offers additional advantages you may not be aware of:
- Multiple users can open, access, edit and save a centrally shared document.
- When a user saves a document, it is not overwritten. It is merged (when you configure the document appropriately).
- It’s still safe. Credentials are stored in different (personal and encrypted) documents and connections refer to them by name. So each user just needs another document containing a credential with the same name as specified in the connection.
- No need for SQL! Since this all works on the file system level, there’s no need to install, maintain, prepare or do anything on a SQL server. Just put the document for your team on a network share where everyone has at least read access.
- Also works with all the cloud based file sync services! Even when you are not working in a team, you may use Royal TS/X from different computers. Put your document(s) in the cloud using services like Dropbox, iCloud Drive, Box, etc. and sync your changes to all your other machines instantly.
- There are no licensing restrictions! This feature works with all Royal TS/X licenses (since Royal TS V2/Royal TSX V1), even when you use it for free in limited shareware mode. Although, in shareware mode you cannot open multiple files and it’s only allowed to have up to 10 connections per application instance. In this case the credential(s) must be stored in the Application document but in general it works.
Have you seen our Royal TS V2 introduction video?
Pre-requisites to make this work
As mentioned before, no SQL server is necessary and we think this is a huge advantage. Still, you need to be aware of some things before you start building up a shared document:
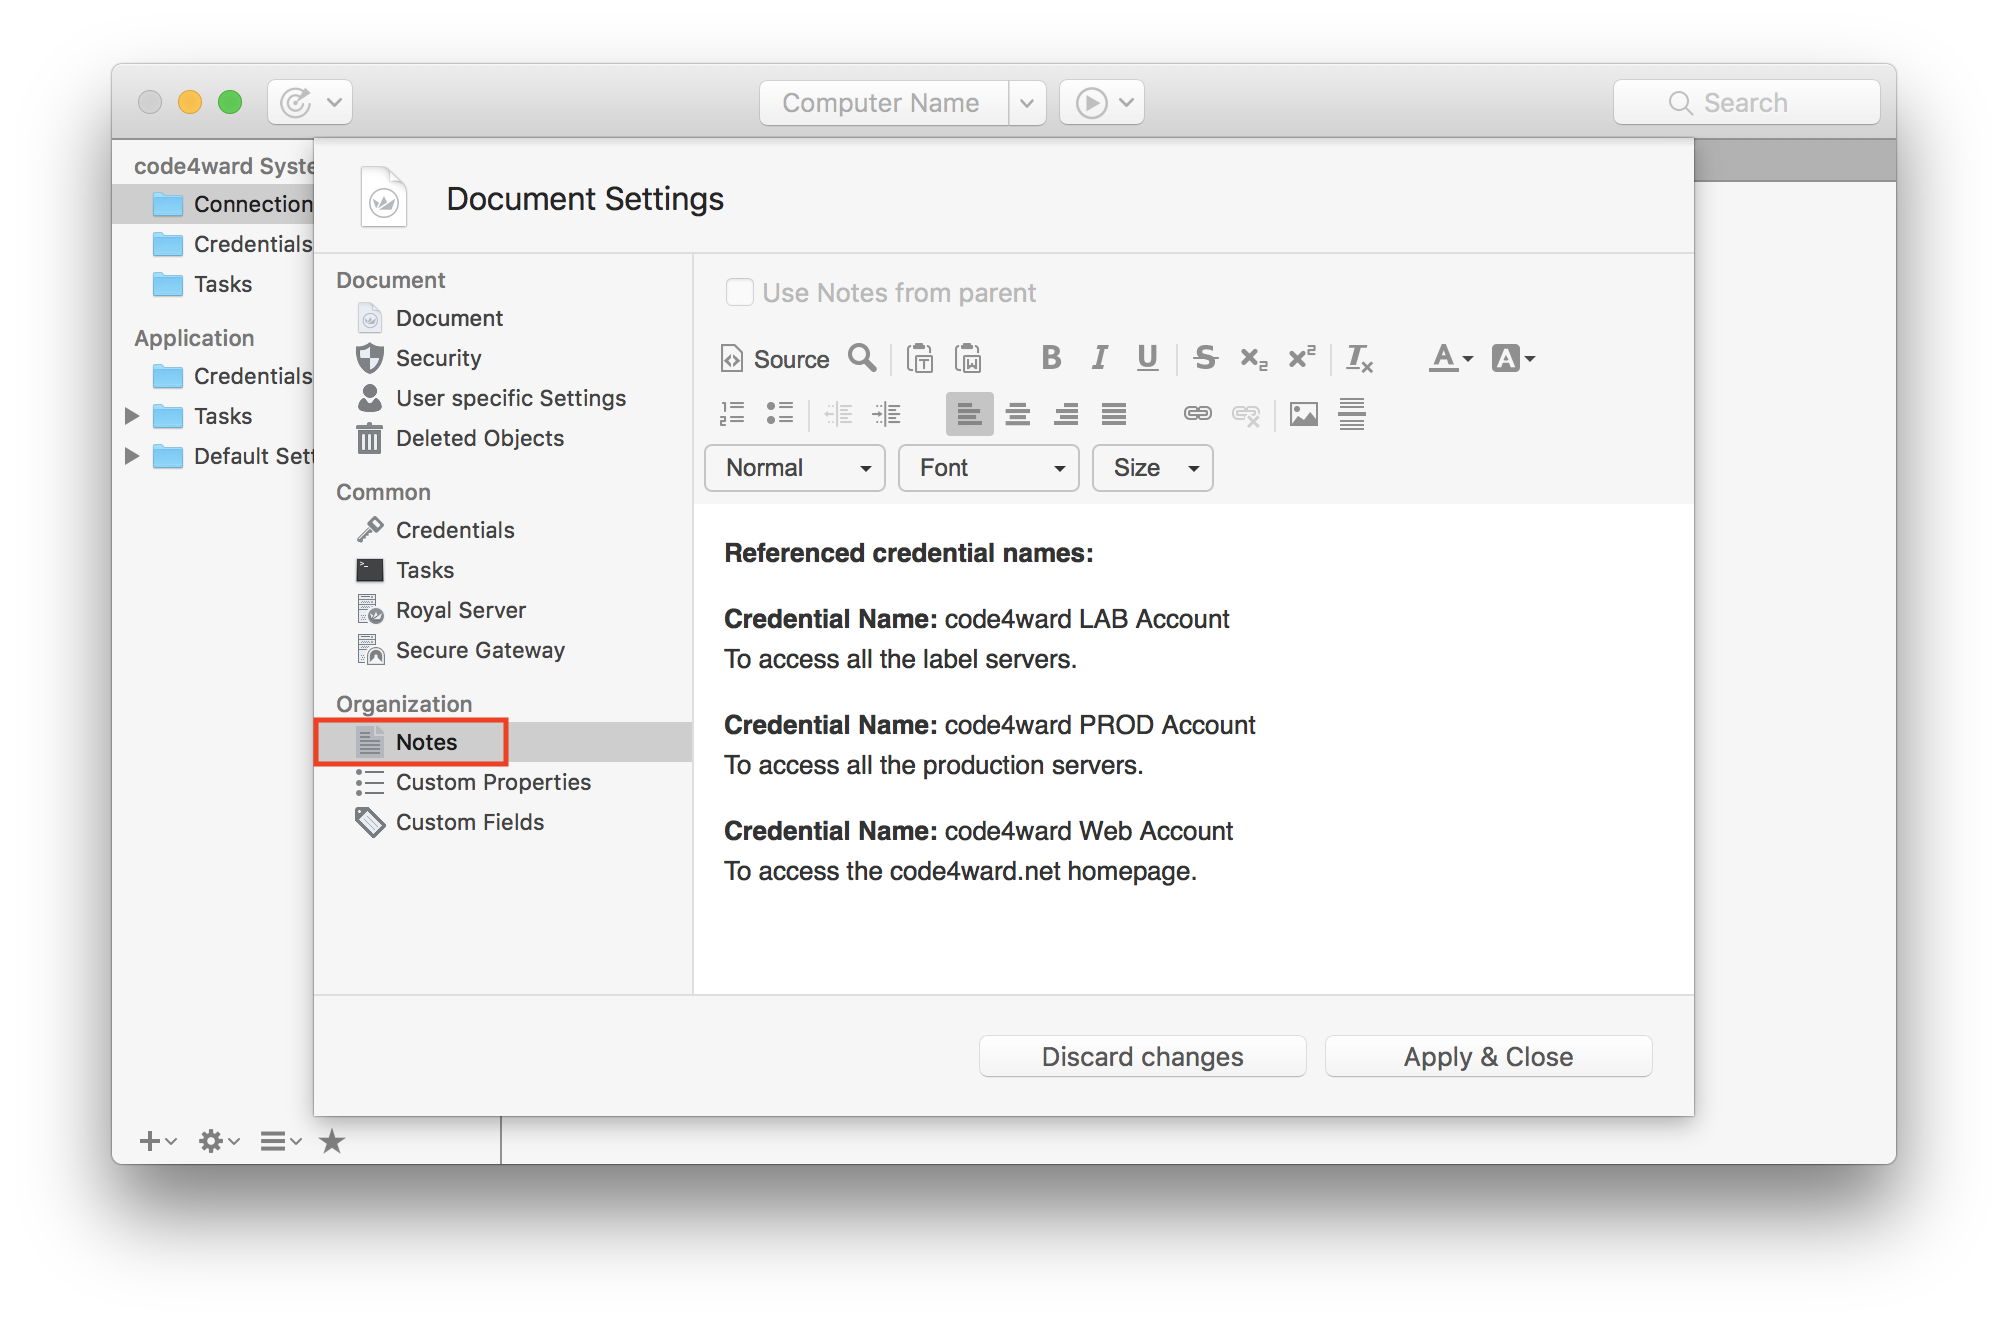
- You need to define or agree on the credential name(s) which will be used on the shared connection objects. The notes section of the shared document (or of the particular folder) might be a good place to write down the required credentials.
- Agree on a file location where you put your shared document(s). This might be a network file share where everyone has access to or a shared folder in cloud based sync service.
That’s it.
Create and prepare the shared document
Royal TS (for Windows):
Royal TSX (for macOS):
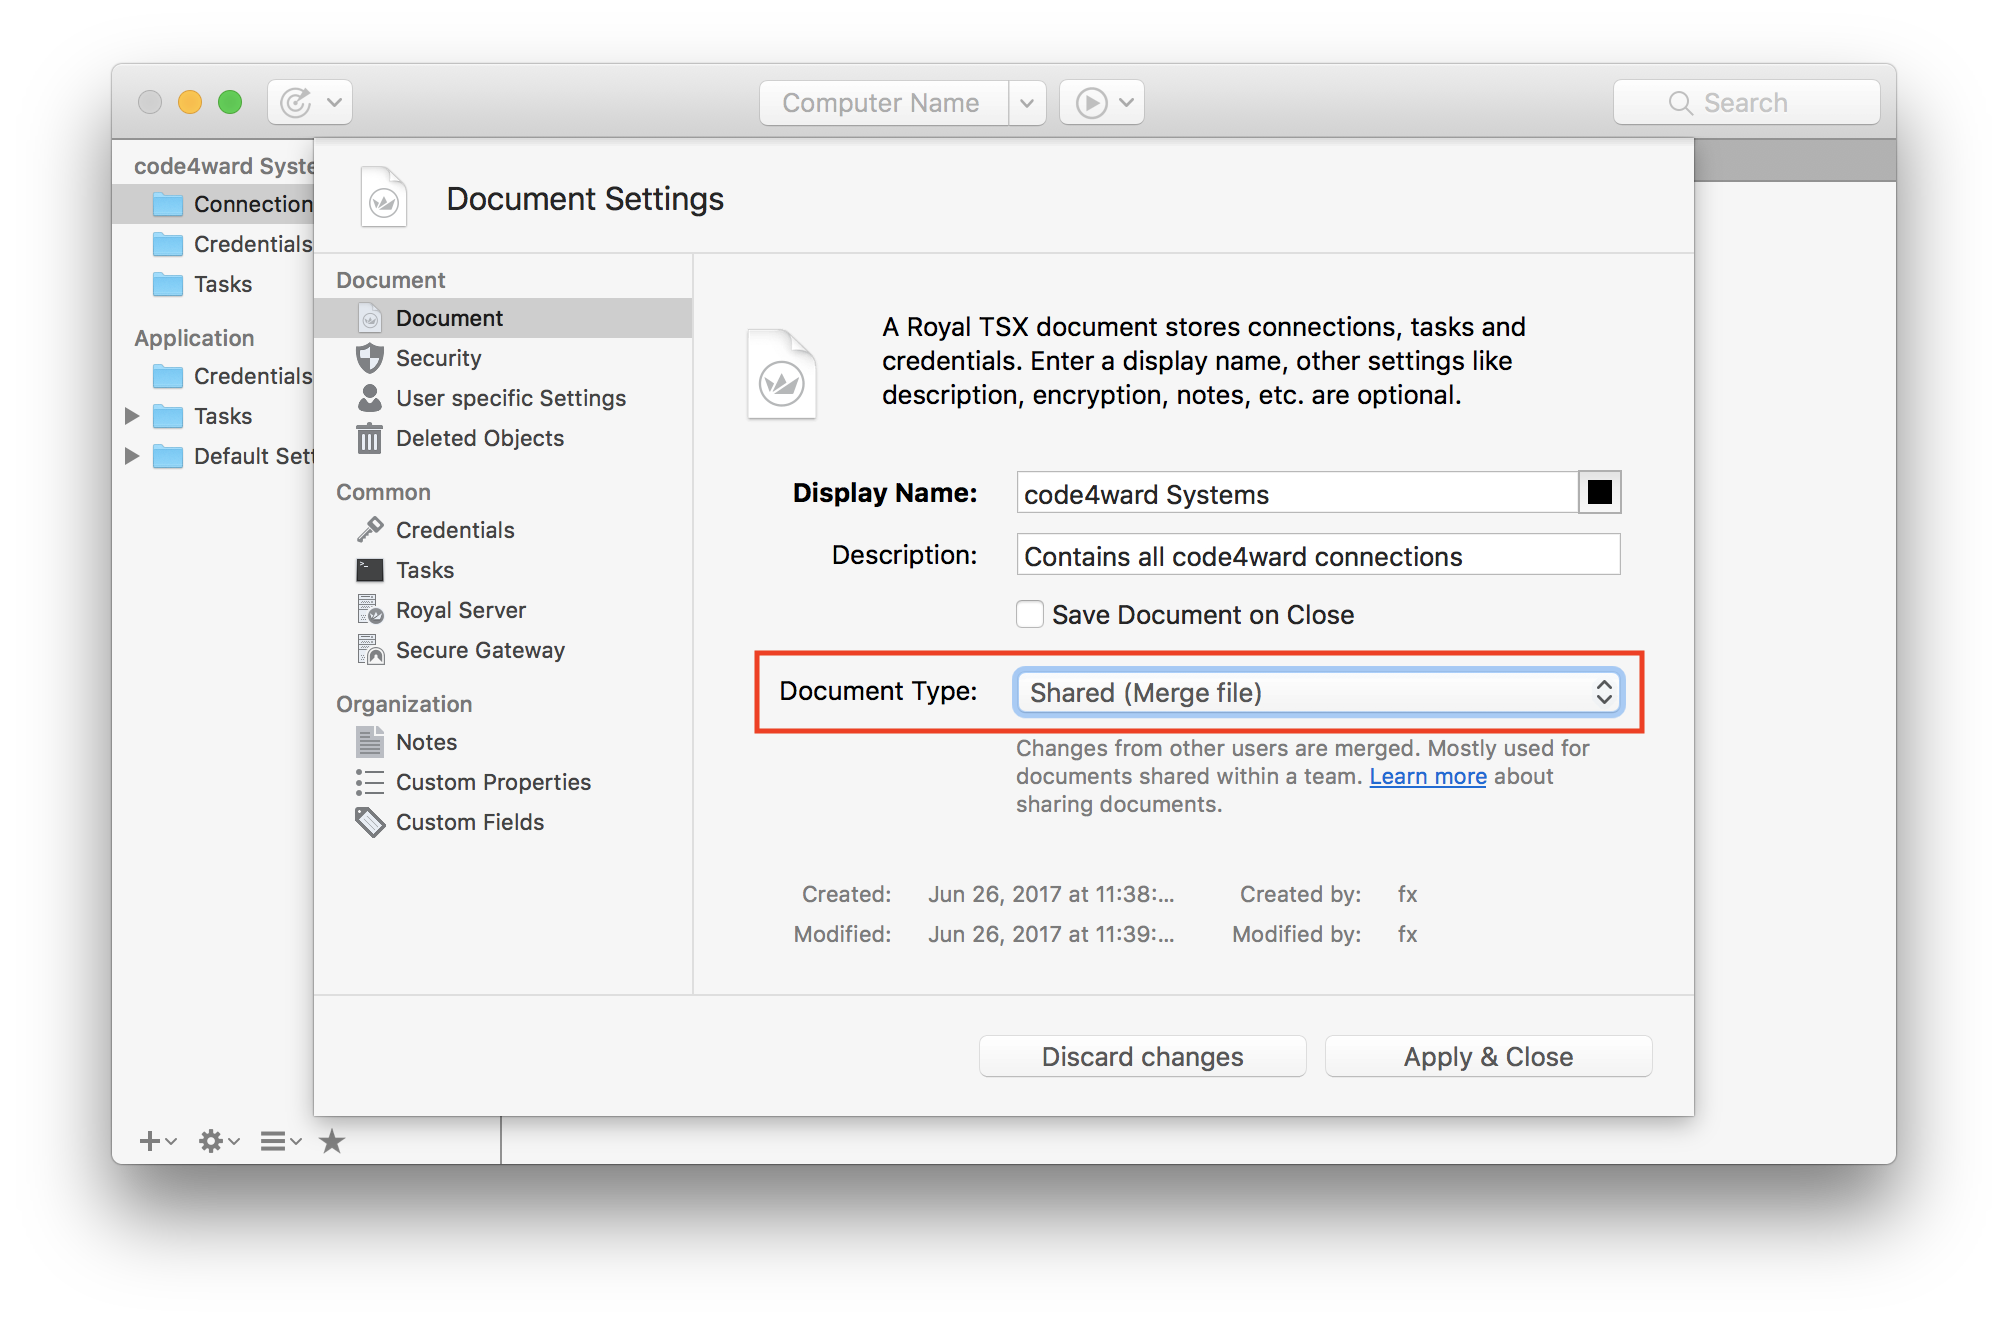
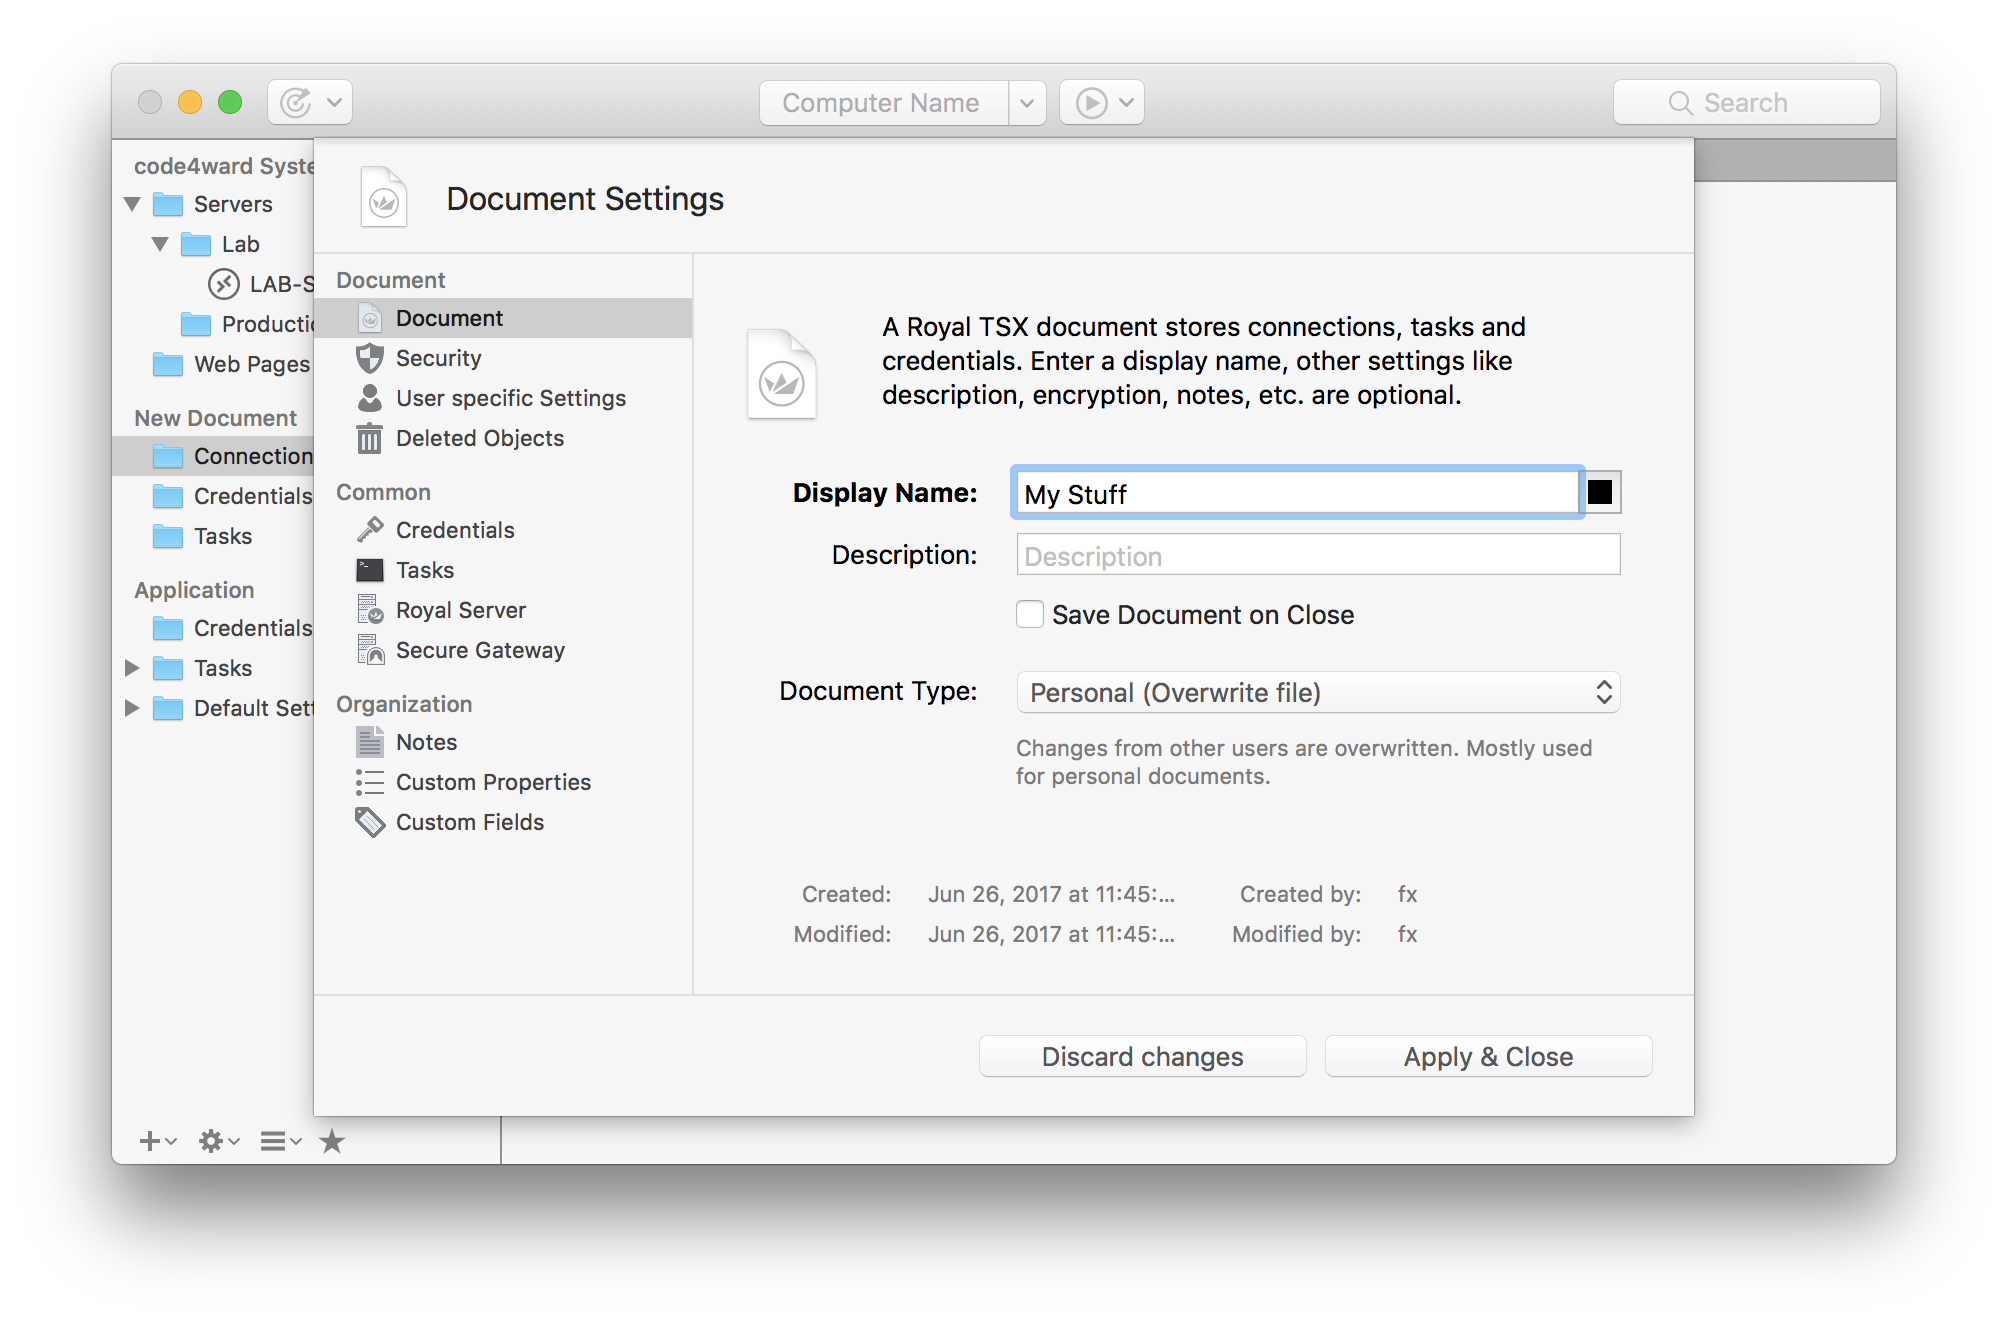
Click on New on the Home tab to create a new Royal TS document. Enter a meaningful Display Name, optionally provide a Description and make sure you set the Document Type to Shared (Merge file). This will prevent the file from being overwritten when a user saves the document. The file on disk will be synced with the contents you have in memory.
In Royal TSX (for macOS) follow these steps: Go to File - New Document. Control-click/Right-click the newly created document and select Properties. Set the Document Type to Shared (Merge file) if it isn't configured to that value already.
In this example I will use 3 different accounts for my connections to illustrate how this works:
The credential to access all servers in the LAB domain must be named: code4ward LAB Account
The credential to access all my production servers must be named: code4ward PROD Account
The credential to log on to the code4ward.net homepage must be named: code4ward Web Account
Like I said before, it would be a great idea to put that in the document Notes to instruct new users how to setup their credentials:

Royal TSX (for macOS):
That’s all it takes to create and prepare a document to share it with a team of users. All you need to do is to save it to a location everyone has access to and create your connections. I have saved the document to a shared folder on my network and prepared the folder structure the way I want it to be.
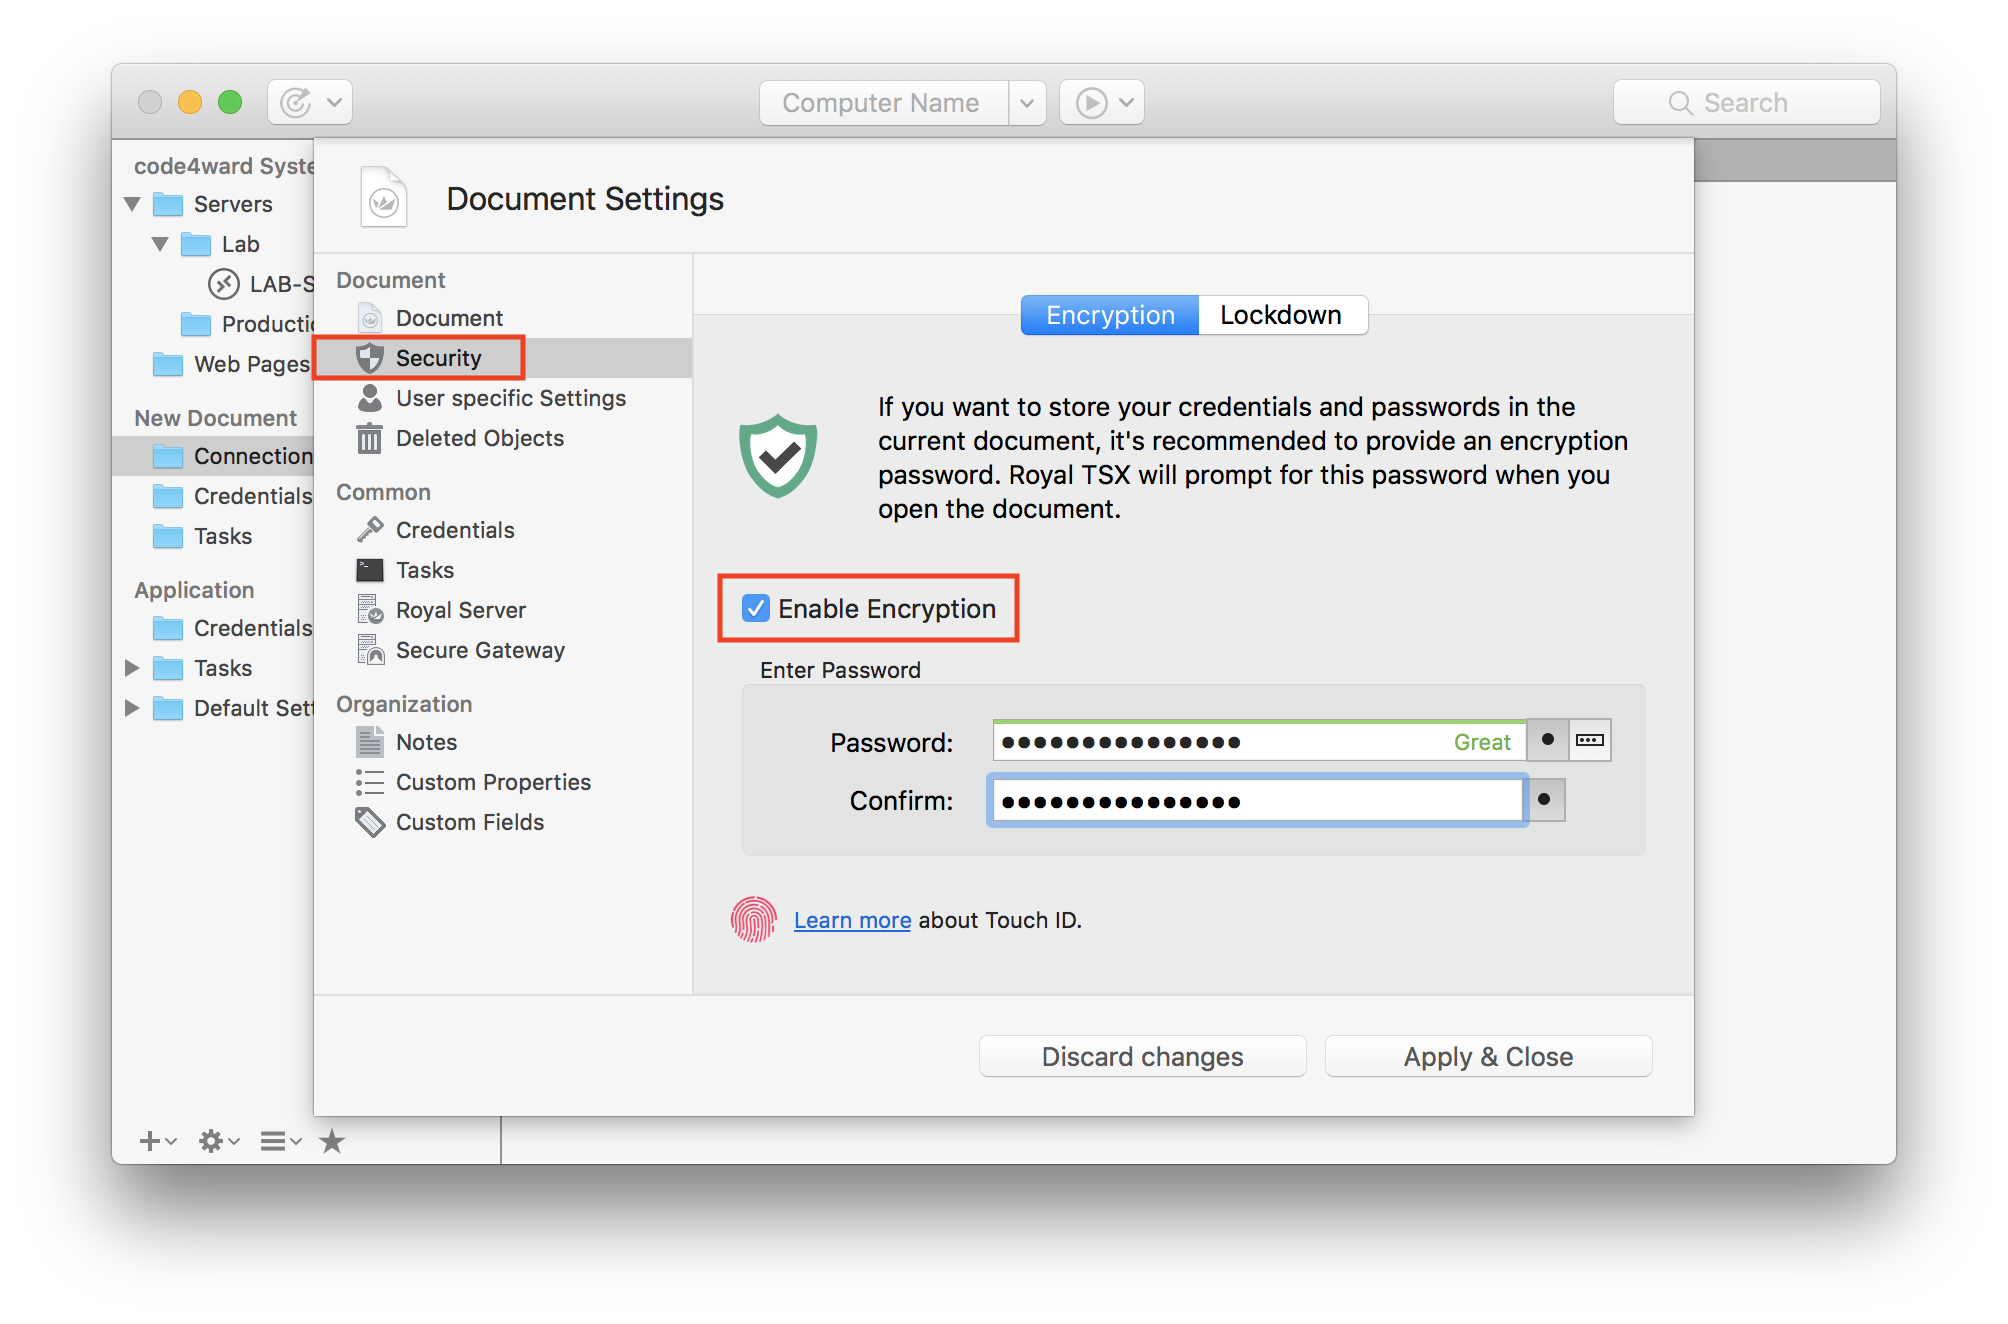
Note: We are not encrypting and password protecting this particular document. Since we aren’t using any usernames or passwords in that document it might not really be necessary to protect the document. Anyway, if you like to password protect (and encrypt) the document, you can do that, of course. If you do, users are required to enter the appropriate password in order to open and access the document.
Create connections in the shared document
First I create a new Remote Desktop connection for a LAB server:

Royal TSX (for macOS):
On the Edit tab, then on Remote Desktop to add a new Remote Desktop connection. Enter a Computer Name (host or IP address), a Display Name and optionally provide a Description. Then switch to the Credentials settings page:
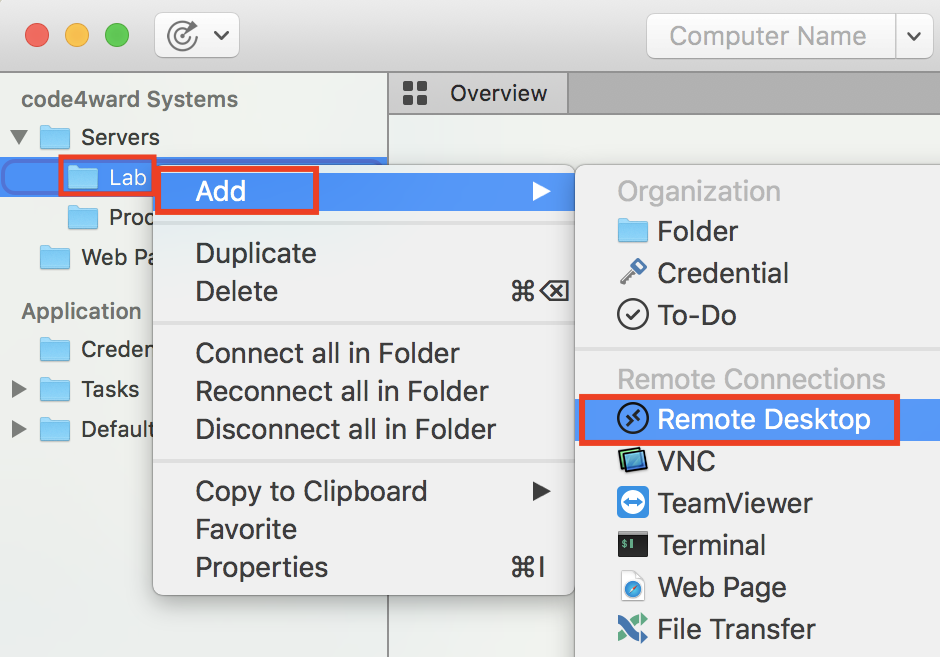
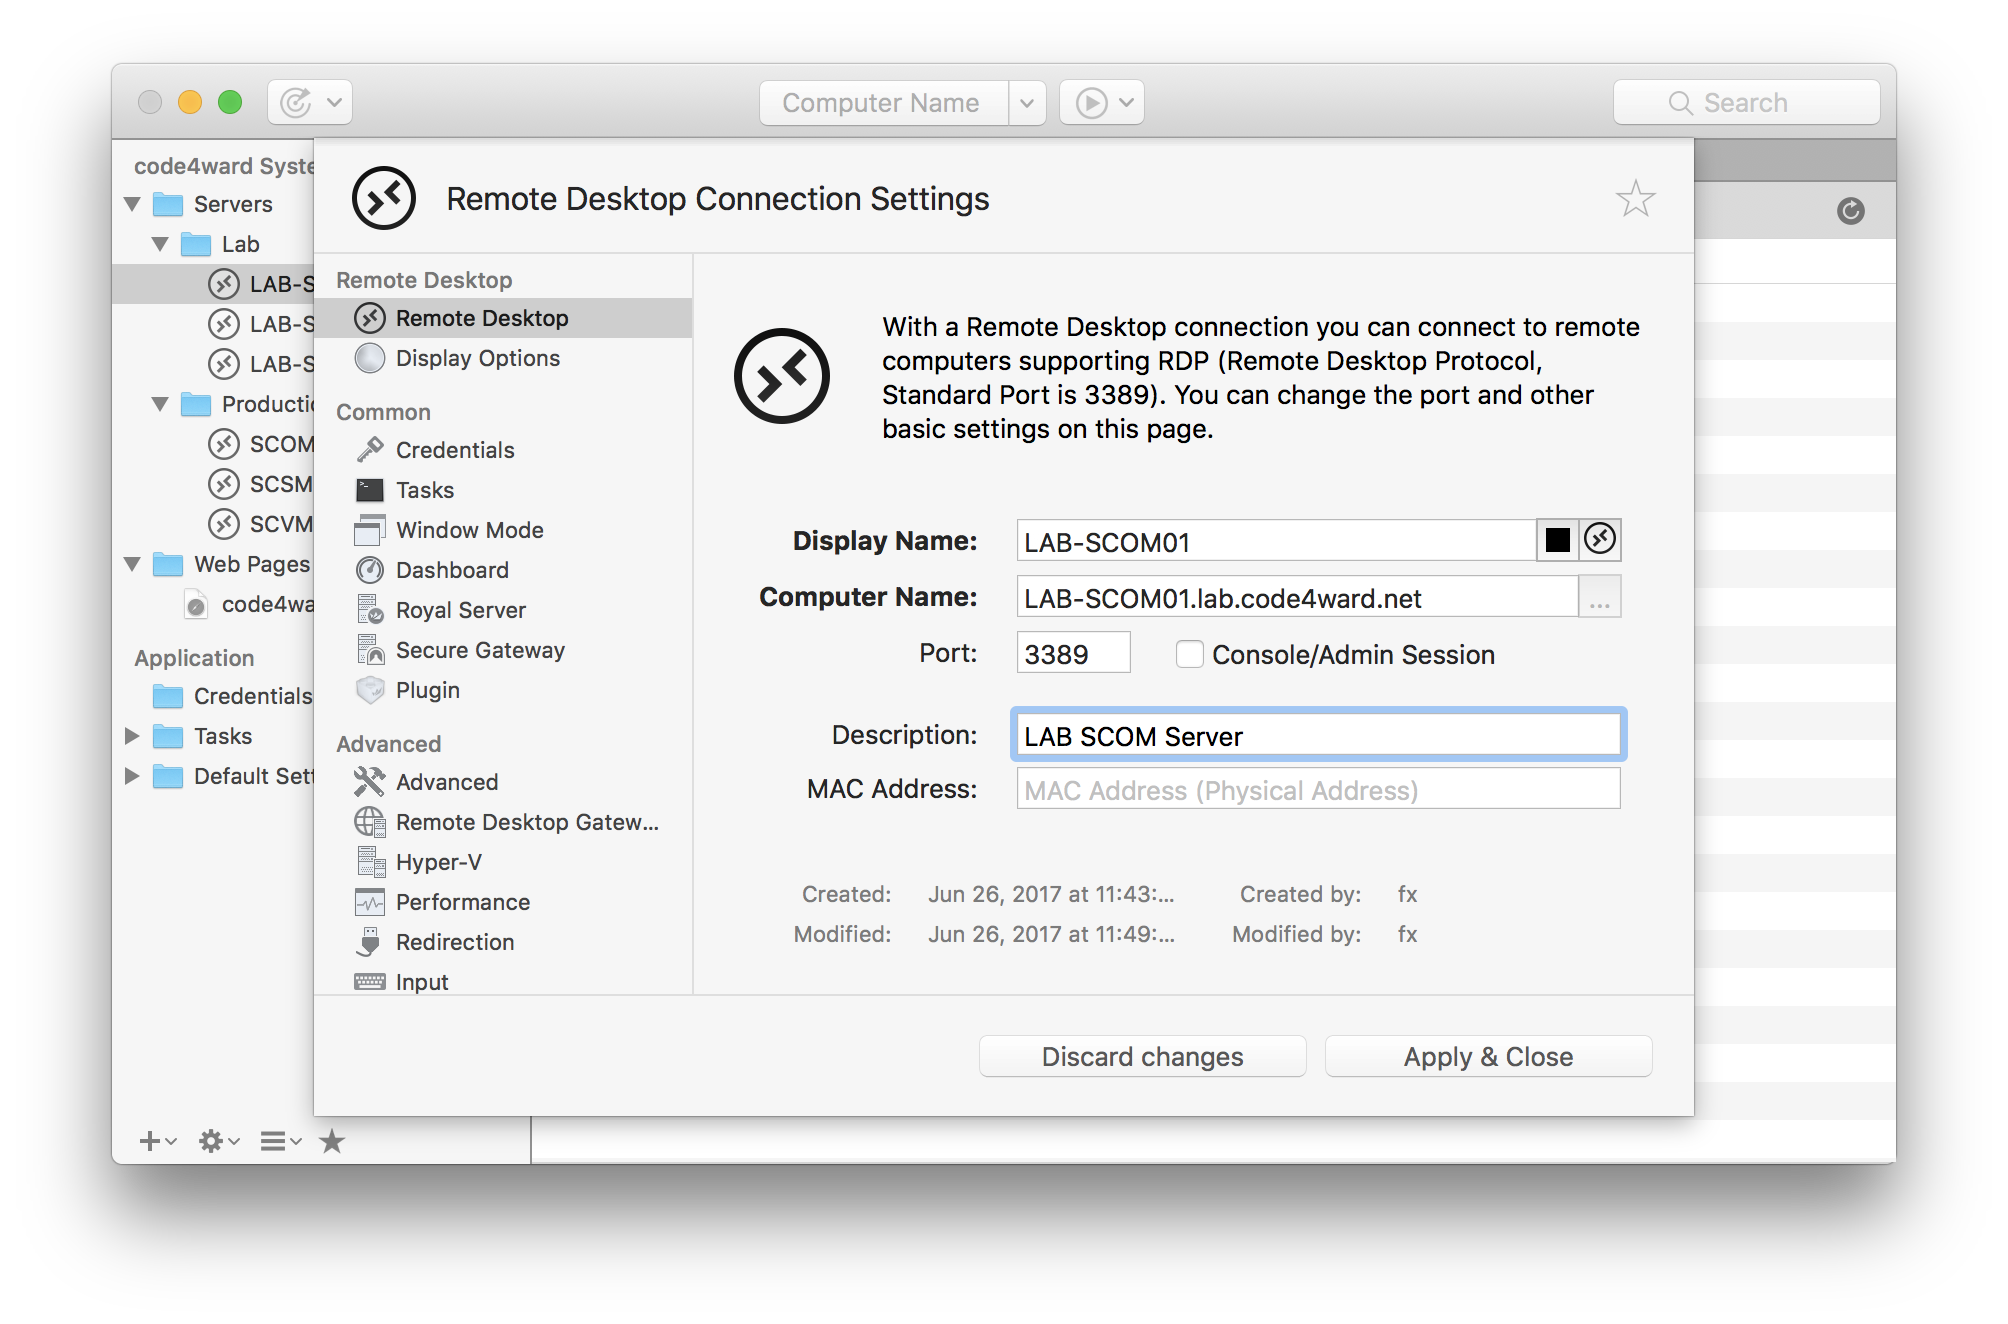
In Royal TSX (for macOS): Control-click/Right-click the folder you want to add the connection to and select Add - Remote Desktop. Enter a Computer Name (host or IP address), a Display Name and optionally provide a Description. Then switch to the Credentials settings page:

Royal TSX (for macOS):
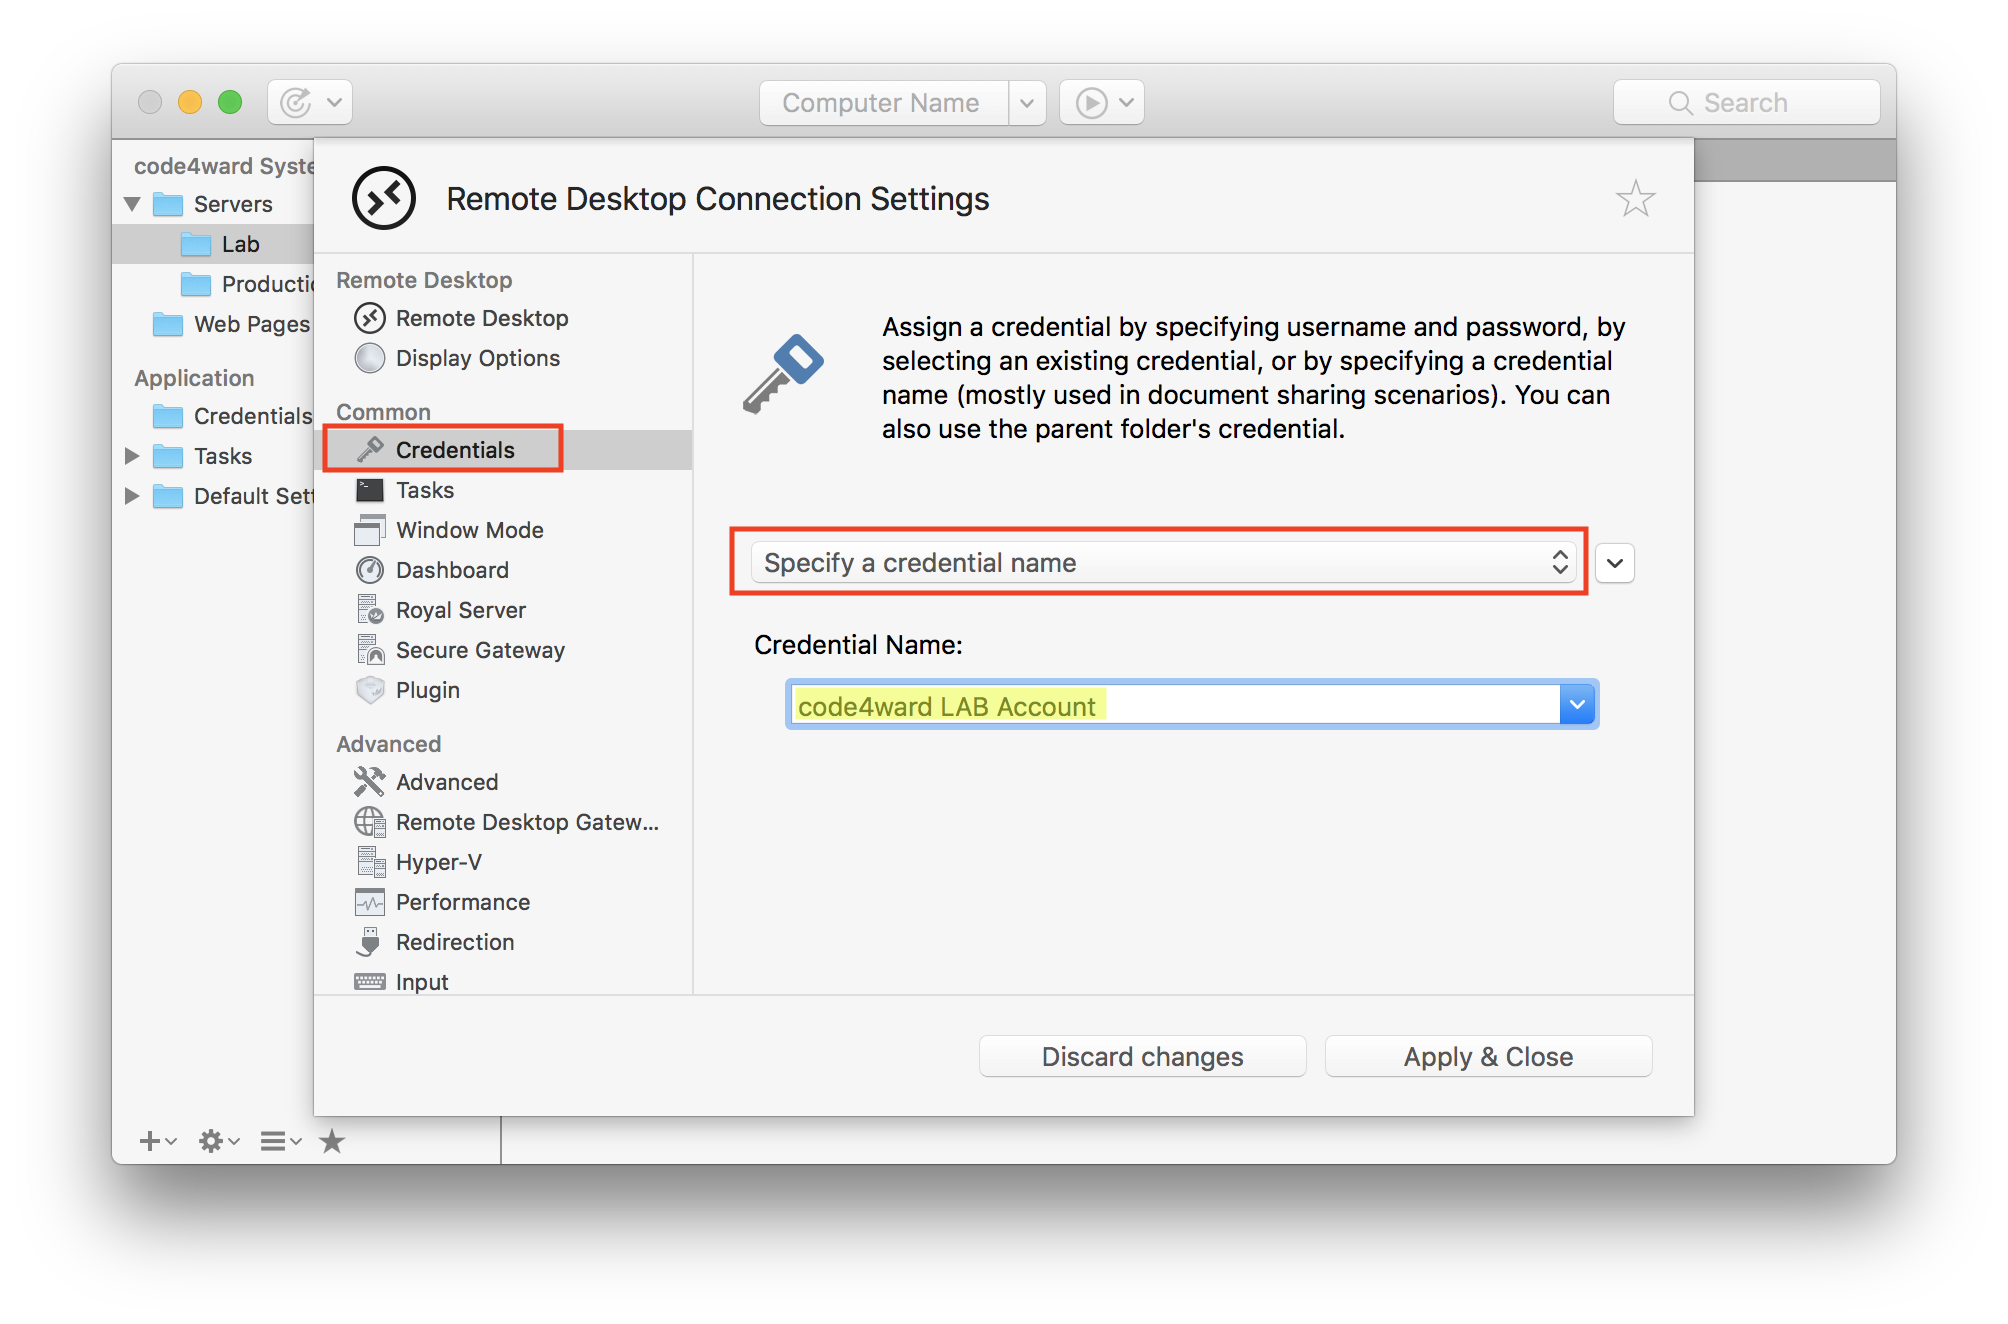
Select Specify a credential name from the drop down list and enter the exact name of the credential Royal TS/X should look for when the connection is being established. Attention: the credential name is case sensitive and needs to match exactly the name of the credential we create in the next step!
You may configure other settings of the Remote Desktop connection as well. I will repeat those steps and create some more lab servers using the same credential configuration.
Then I will create my production servers and configure the Remote Desktop connections the same way as the lab servers except that I use code4ward PROD Account as credential name.
I will also create a new Web Page connection. The credential configuration works the same way as for Remote Desktop connections but the credential name for the web page connection will be code4ward Web Account.
So, all connections are created, configured to use a credential (which doesn’t even exist yet) and stored to a central location. If you now want to try to connect to a server or web page now, Royal TS/X will start the connection but it cannot find the credential with the name specified. Royal TS/X will just leave the credentials blank. This means that in most cases you need to manually type in username and password.
Create your personal document and the credentials needed for the shared document
Now let’s create my personal and private document where I store my credentials:

Royal TSX (for macOS):
Since we are putting usernames and passwords in the document, I strongly recommend to password protect and encrypt the document:

Royal TSX (for macOS):
Save your personal document to a private location (your home folder, for example). You can use your personal document(s) to store personal connections and tasks as well but in this case we just create the 3 credentials in order to successfully use the shared document.

Royal TSX (for macOS):

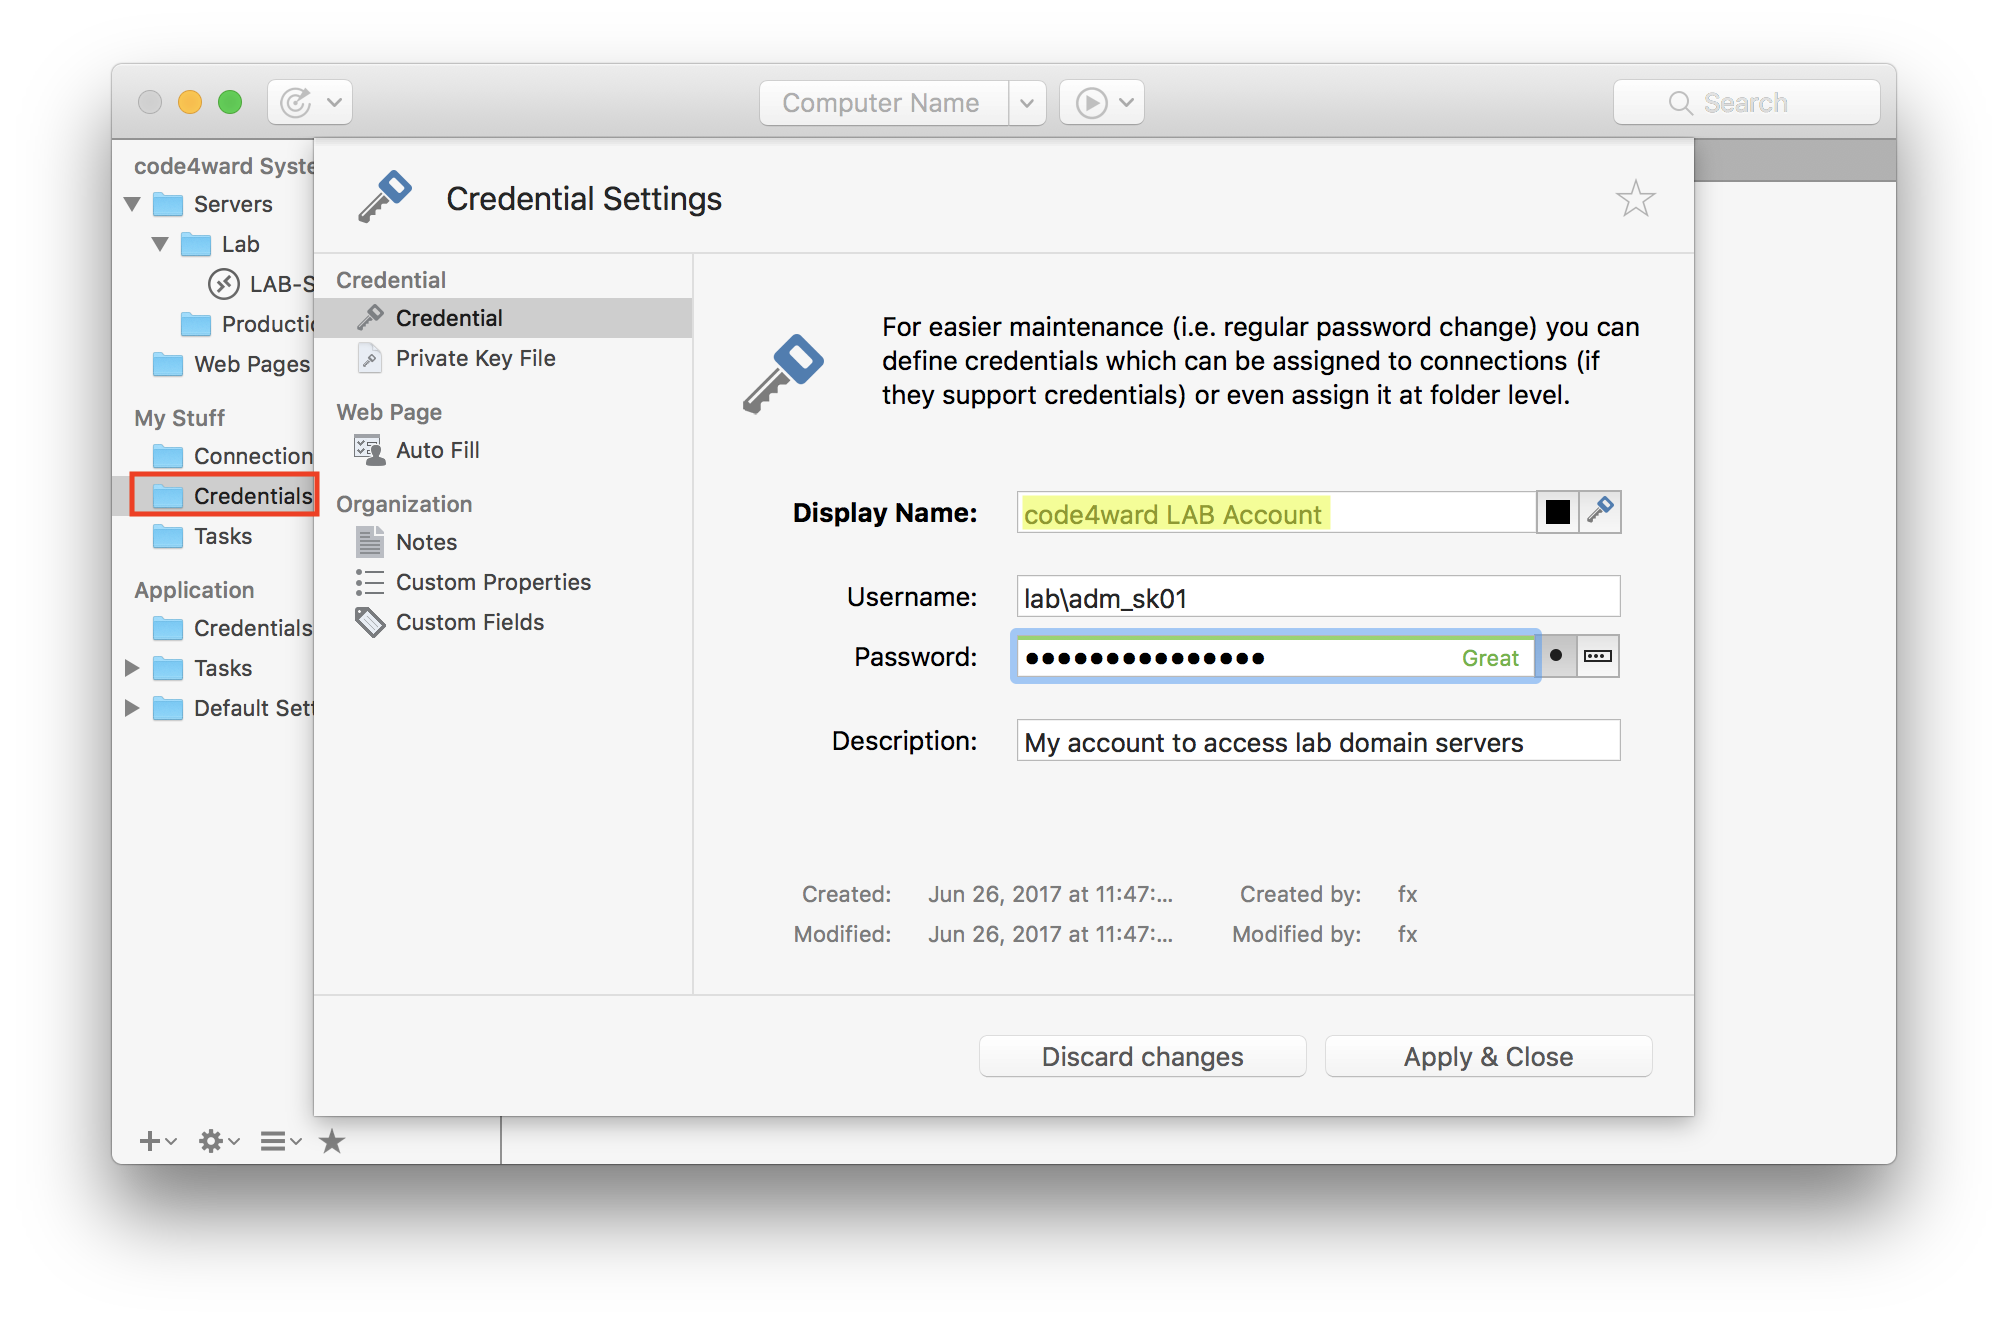
One the Edit tab, click Credential to create a new credential. In Royal TSX (for macOS), Control-click/Right-click the folder you want to add the credential to and select Add - Credential. Make sure you enter the exact same Display Name as previously specified in the credential settings of the connections in the shared document.
I will repeat this step for the other credentials as well: code4ward PROD Account and code4ward Web Account
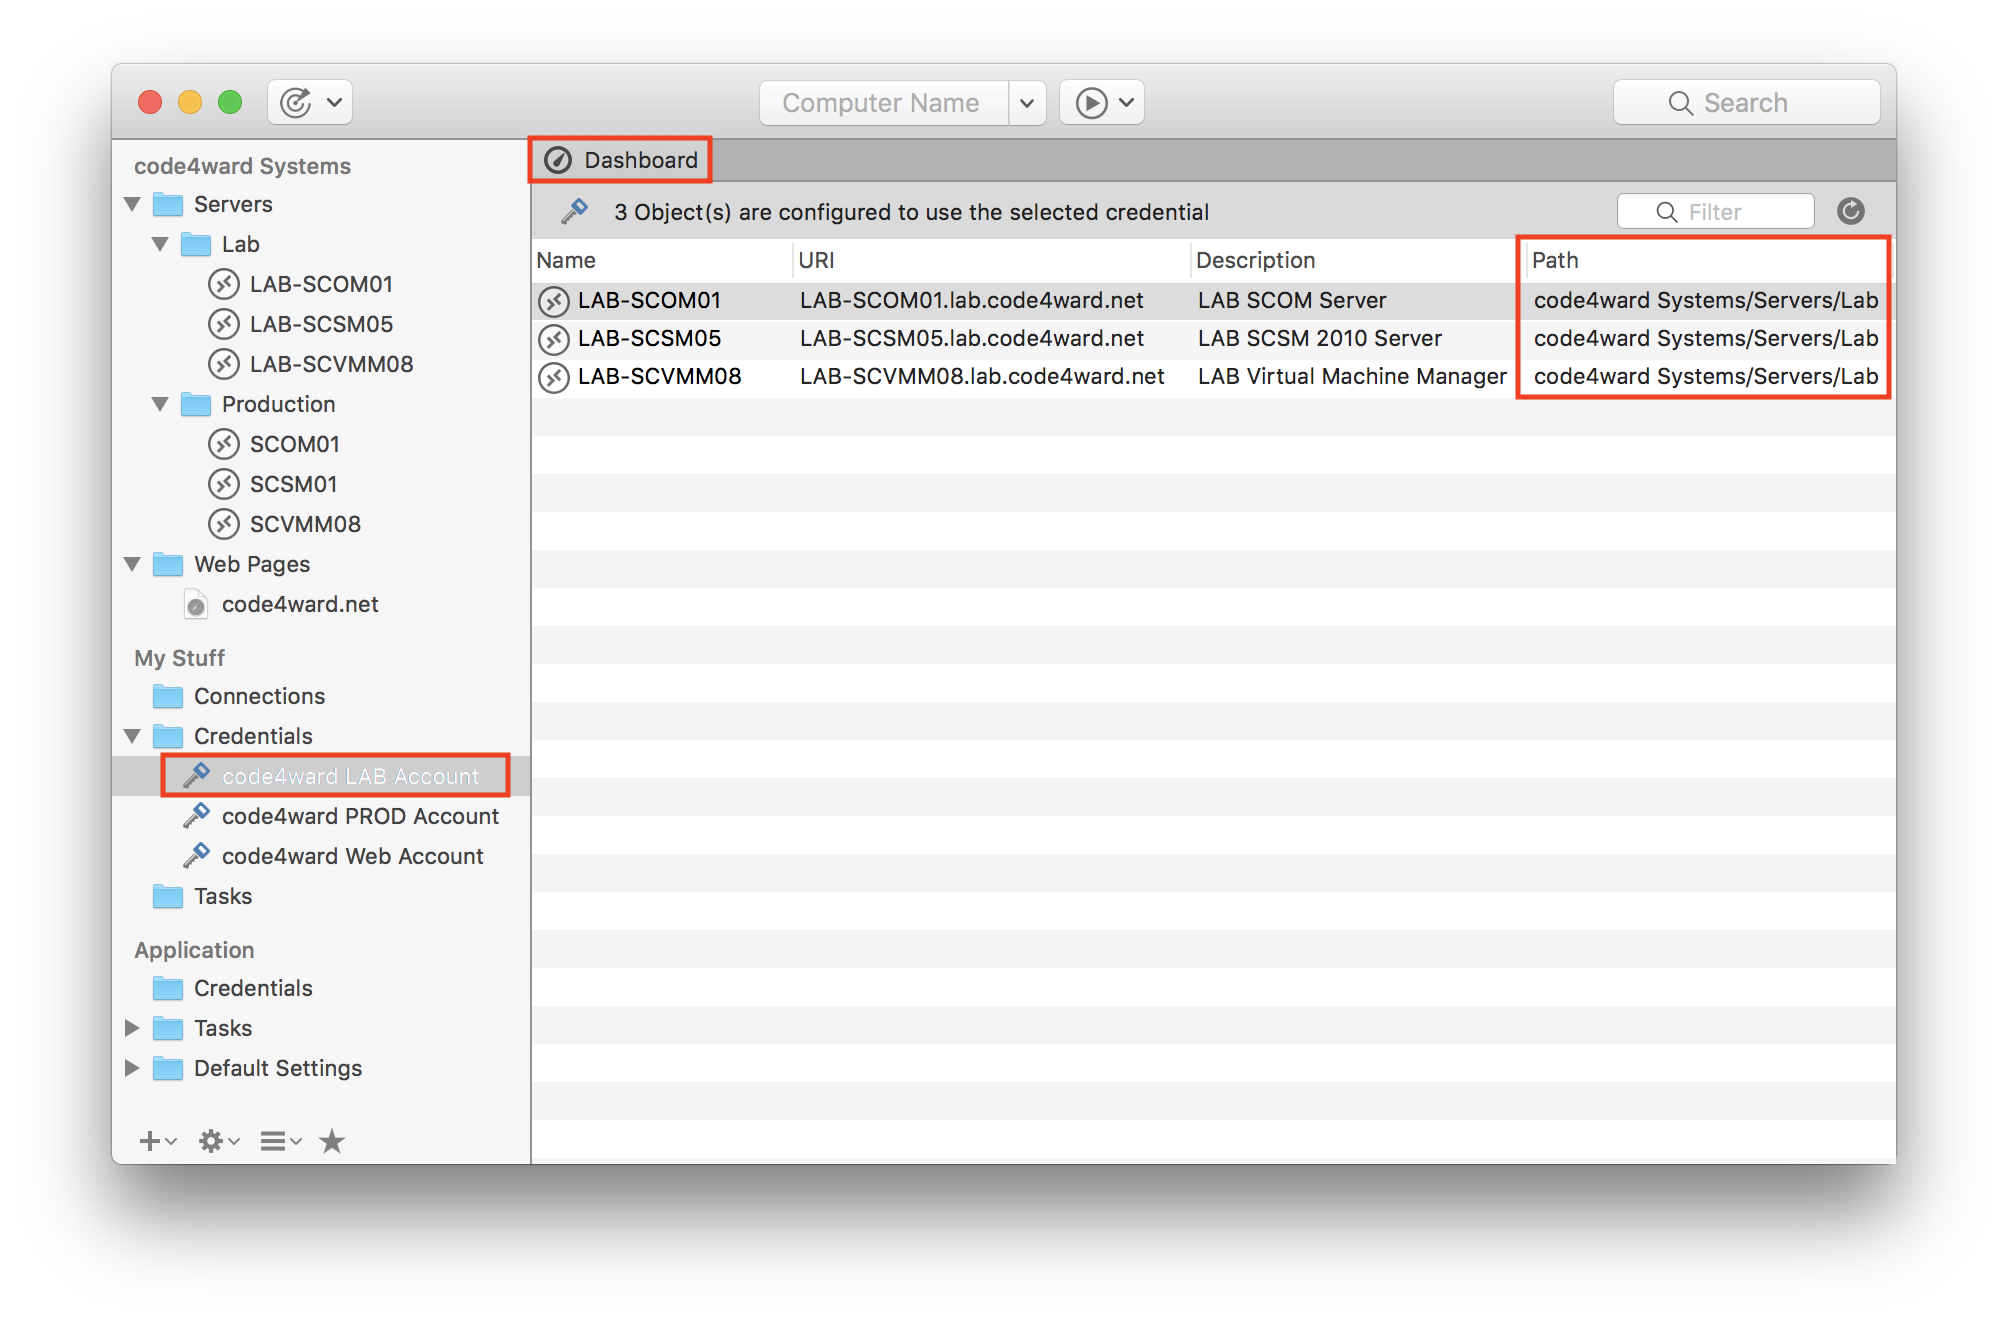
When you click one of the credentials, the Dashboard will show you all connections referring to this credential. This is an easy way to verify that you configured the connections and credentials correctly:

Royal TSX (for macOS):
After setting up your credentials, connecting to one of the connections will now resolve your credentials. You just need to ensure that the document with your personal credential details is loaded in the same application instance.
All other users who want to use the same shared document in Royal TS/X only need to create their own personal document and setup their credentials the same way as explained above. Then, open up both, the shared document and the personal document to automatically log on to systems with your personal credentials.
Here’s a little timesaver
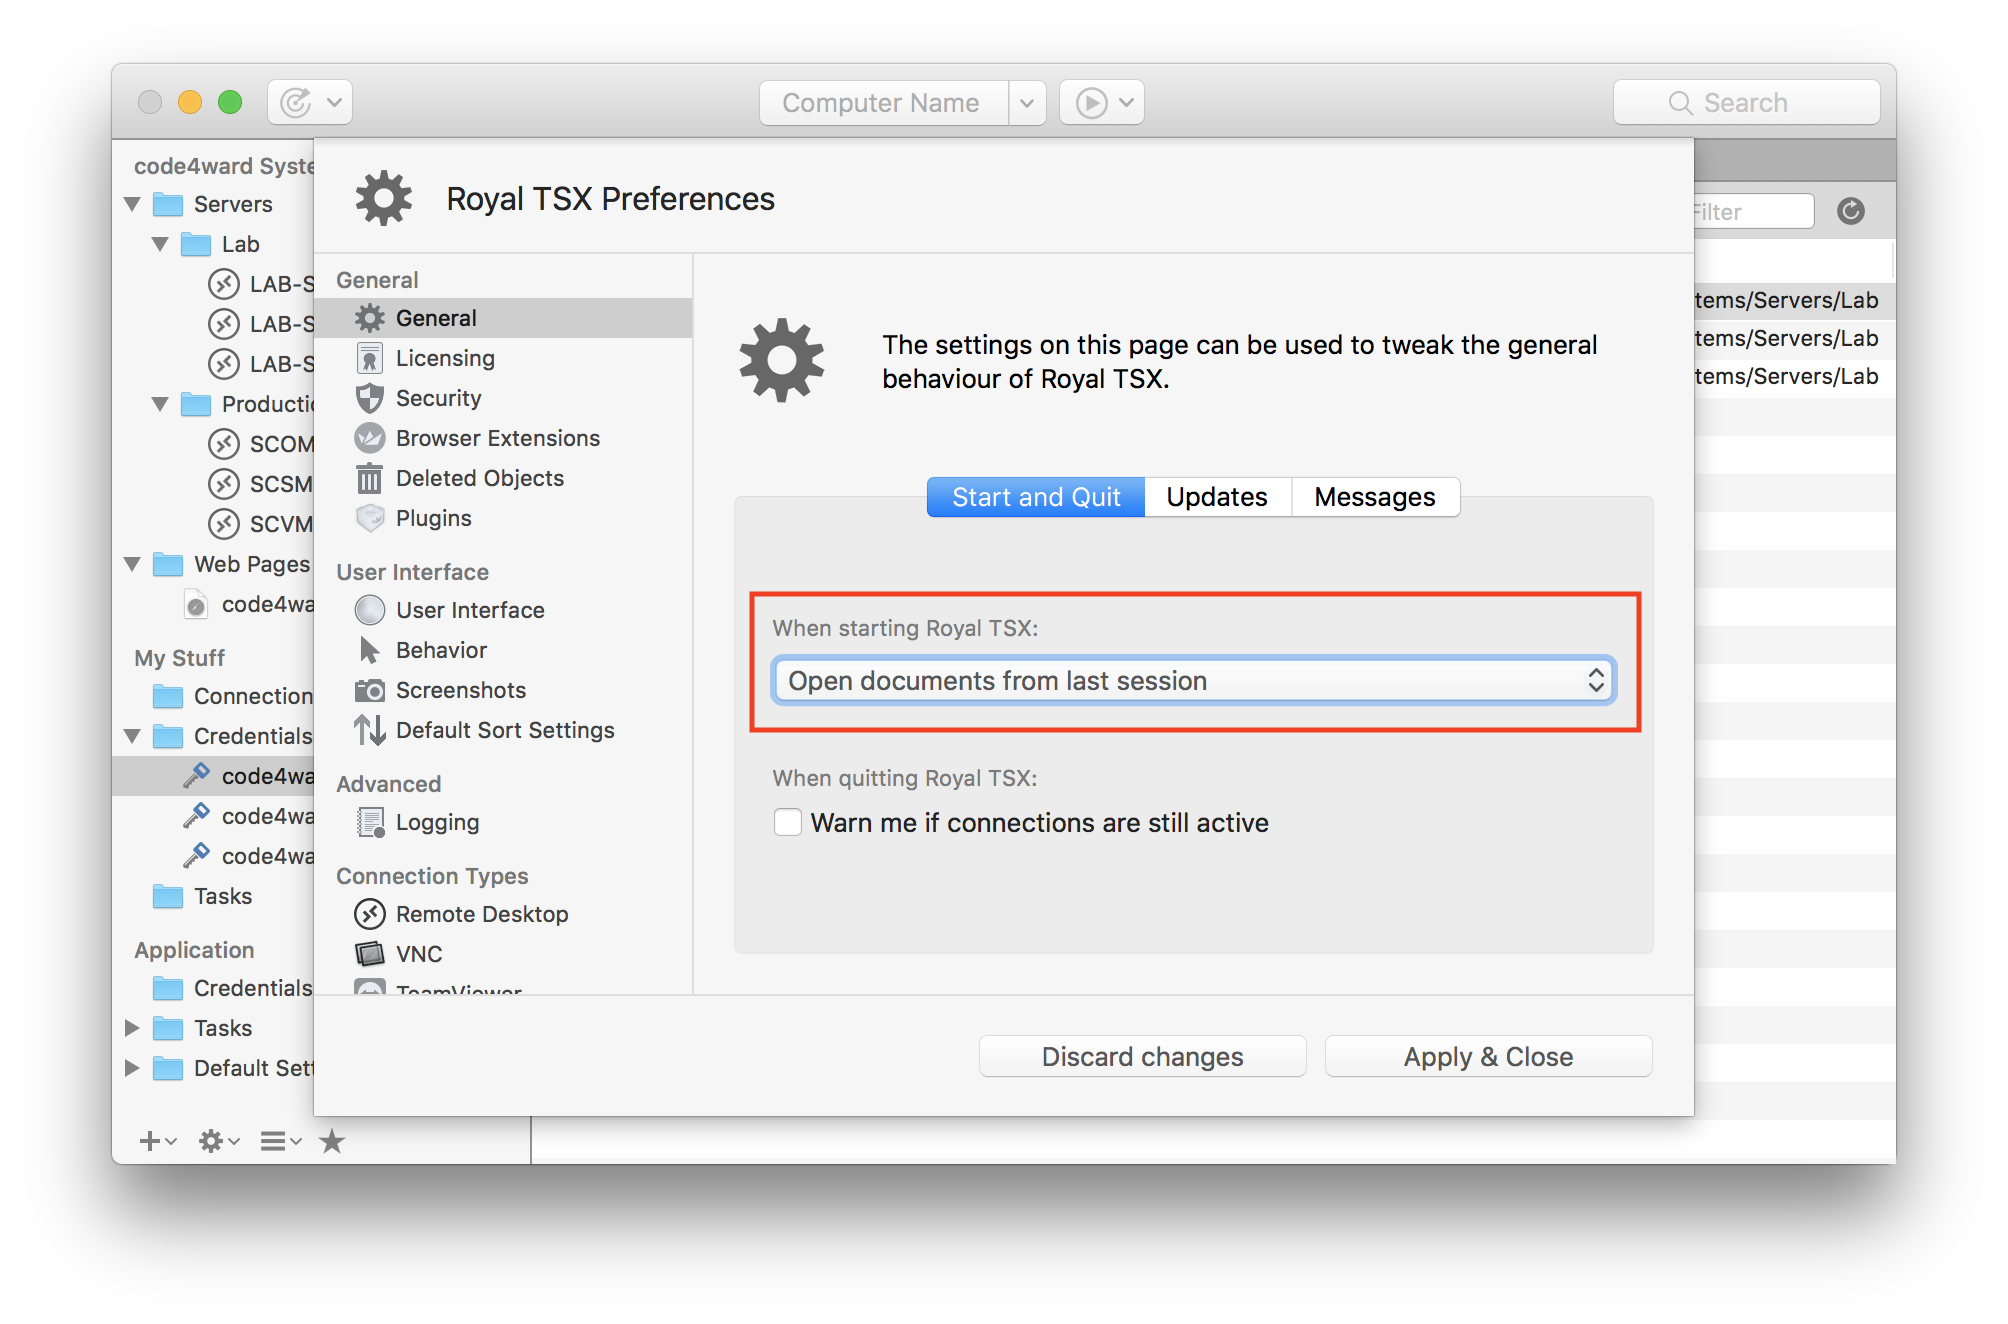
If you have to open multiple documents every time Royal TS starts up (the shared document and your personal document, for example), you can use the Application Start setting in the Options to specify a list of documents to open automatically when you start Royal TS:
This is supported only in Royal TS (for Windows). However, Royal TSX (for macOS) is by default configured to load all previously opened documents when launching the application so basically it will remember which documents you used the last time. You can configure Royal TS (for Windows) to do that too.

Royal TSX (for macOS):
Document-Changed-Indicator
If you use a shared document in a team, you might be interested to get notified as soon as someone in your team changed something in the shared document. Royal TS offers an indicator for that in the status bar:

Royal TSX (for macOS):
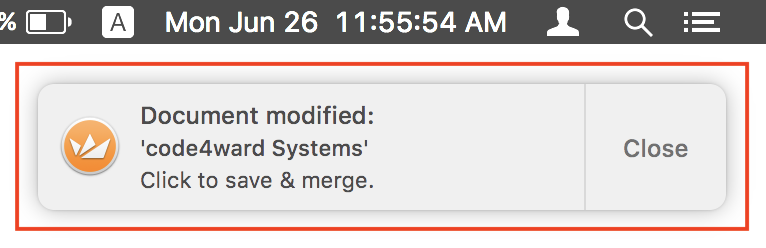
If you see the little disk icon in the status bar, one or more documents have changed outside your Royal TS instance. Hovering over the icon will show you which documents were changed and double-clicking on it will save and merge the changed documents with your document version.
In Royal TSX (for macOS) we instead present a standard system notification which can be either dismissed without taking any action or when clicked, will merge the document that has been modified.
What about Royal Server's Document Store?
Even though we found an elegant solution to make team sharing available without the need for a SQL server backend, we introduced a Document Store component in our Royal Server product. All the above concepts (naming convention and lookup for the credential name at connect time) still apply. Think of the document store as an alternative to storing documents on the file server.
Conclusion
As you can see, it’s very easy and intuitive to link credentials to connections even from different files and this makes Royal TS/X a perfect candidate to work in teams without compromising security.
Royal TS/X offers the best way to work in teams and provides great flexibility to work in most, if not all scenarios. Because Royal TS/X can operate in a multi-user environment without the need of SQL database systems or any other 3rd party tools for that matter, it’s one of the easiest and most powerful remote management tools available today.